

Simple Wood Queen Bed Frame: A Step-by-Step DIY Guide
Posted by Meliusly
Your mattress is still usable, but the bed creaks when you turn over and dips when you sit near the middle. A simple wood queen bed frame looks like an affordable weekend project, until you start deciding how the corners connect, where the slats sit, and whether the mattress warranty allows your support layout.
At Meliusly, we help homeowners extend furniture life rather than replace otherwise serviceable pieces. The same principle applies to a DIY bed: build a reliable support structure first, then worry about the finish. A clean-looking frame won't stay comfortable if its joints rack or its center support never reaches the floor.
Queen Frame Cut List and Dimensions
The mattress is leaning against the wall and the lumber is still square on the sawhorses. The first cut sets the opening, so check the mattress warranty and the mattress size before the saw starts. This cut list is a worked example for nominal lumber, end rails fitted between the side rails, and slats carried on continuous inner ledges.
Queen frame cut list
| Part | Qty | Length | Notes |
|---|---|---|---|
| Side rails | 2 | 83 in | 2x6; run the full length and carry the mattress edge |
| End rails (head and foot) | 2 | 61 in | 2x6; span between the side rails |
| Center rail | 1 | 80 in | 2x6; runs lengthwise to shorten the slat span |
| Legs | 5 | Cut to chosen height | 4x4; four corner legs plus one center leg that reaches the floor |
| Slats | 13 | 61 in before fitting | 1x4; trim for installation clearance and support on continuous inner ledges |
The side rails run the full length and carry the mattress edge. The end rails tie the frame square. The center rail shortens the slat span so the mattress does not dip between the sides, and the fifth leg puts that center rail on the floor instead of hanging from fasteners.
The U.S. News mattress-size guide puts the standard queen mattress footprint at approximately 60 × 80 inches (152 × 203 centimeters). That figure describes the mattress, not the frame's outside dimensions. Mattress thickness is not standardized with that footprint, so measure your mattress before fixing finished bed height.
Check the opening before cutting
With side rails that measure an actual 1.5 inches thick, the outside width is 64 inches and the interior opening is 61 × 80 inches. Check the stock with a tape rather than trusting the nominal label, because the actual thickness changes both the outside width and the slat length.
The slats need support inside that opening. Add continuous wood ledgers along the inner side rails, fastened into sound side grain, and align their bearing surfaces with the center rail's top. Ledger stock and fasteners belong on the material list, not in the scrap pile after assembly.
A slat cut exactly to the opening can bind. Cut a test piece, establish a small fitting clearance, then repeat that finished length for all 13 slats.
Calculate the clear gaps
Thirteen slats with an actual width of 3.5 inches cover 45.5 inches. With the outer slats flush to the ends of the support area, the remaining 34.5 inches divide into 12 clear gaps of approximately 2.9 inches.
That layout stays below a 3-inch design target, but the mattress warranty may set a tighter number. If the warranty caps slat gaps below 3 inches or requires a center support that touches the floor, change the slat count or the center rail before cutting. The frame is easier to revise on paper than after the joints are cut.
Before buying lumber: Measure the mattress, sketch the joints, and check every cut against the intended interior opening.
A thicker mattress changes the useful leg height. A headboard changes overall length, attachment details, and wall clearance, so include it in the drawing before you mill the rails.
Materials, Finishes and Tools to Gather
Choose lumber by straightness and condition, not just species. Pine can make an economical frame, while poplar offers another workable option where suitable stock is available. Reject boards with pronounced twist, bow, splits, or large knots where joints and slat bearings will sit.
Gather the structural essentials
- Lumber: Gather the rail, slat, and leg stock from the worked example, plus continuous support-ledger material. Inspect slats individually because a weak knot matters more in a bending member than in decorative trim.
- Hardware: Structural wood screws in 2-1/2-inch and 3-inch lengths are useful starting options, but choose the actual length for each joint's combined thickness and required embedment. Add bed-rail brackets or suitable connectors where a direct screw would otherwise enter end grain.
- Glue and washers: Wood glue strengthens well-fitted, permanent long-grain joints. Use washers beneath bolt heads and nuts bearing on soft wood, but leave intended knockdown joints unglued.
- Tools: Gather a circular or miter saw, drill, clearance and pilot bits, speed square, tape measure, clamps, and a sanding block or sander. A 120-to-180-grit sanding progression is a practical starting point for smoothing ordinary planed lumber.
Glue isn't a substitute for accurate joinery. It works across close-fitting mating surfaces; it won't turn a loose, poorly supported corner into a rigid connection.
Choose a finish for actual bedroom use
Oil emphasizes grain, while stain changes color and generally needs an appropriate protective topcoat. Polyurethane adds a wear-resistant film, and paint gives mixed-looking boards a uniform appearance.
Bare pine dents easily. A sealed finish helps resist scuffs and dirt, but it won't make soft wood dent-proof.
Keep finish off surfaces you intend to glue, and let coated parts dry before bringing them against bedding.
Allow about a weekend for cutting, assembly, and finish drying as a planning example, not a guaranteed completion time. Humidity, product instructions, and additional coats can extend the job. Buy lumber only after checking the cut list against your mattress.
Assemble the Frame with Load-Path Joinery
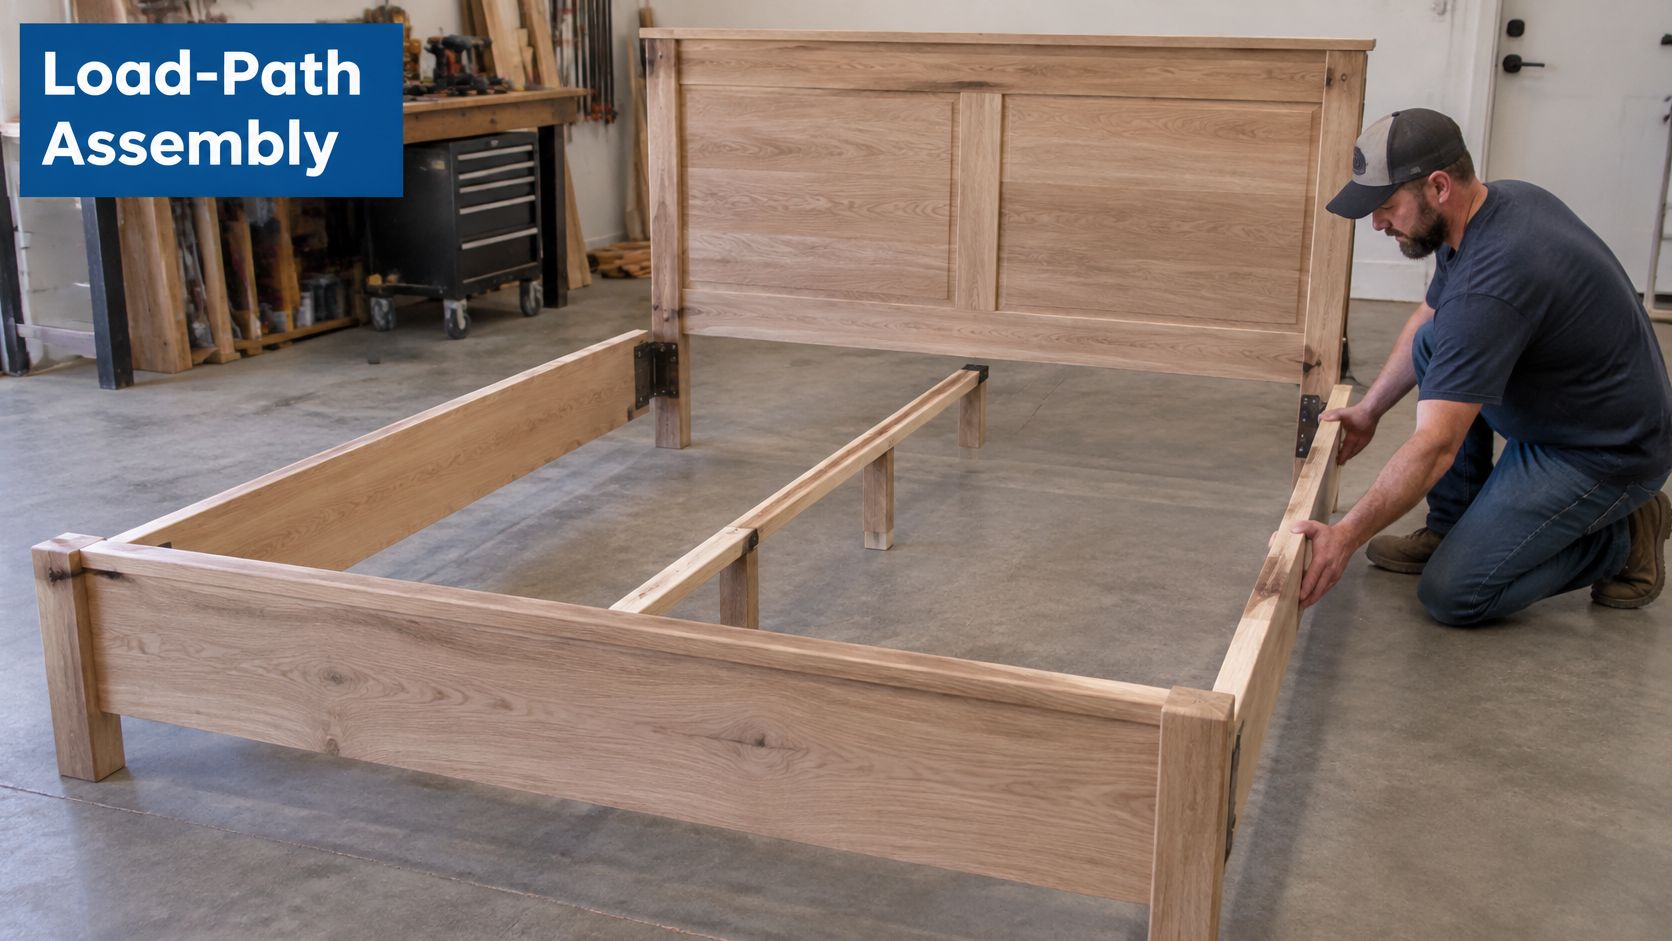
A bed frame needs a continuous load path: mattress to slats, slats to rails, rails to legs, and legs to floor. Screws keep those parts connected, but bearing surfaces should carry the load wherever practical.
The assembly approach in Kitchprep's solid-wood bed construction guide calls for center reinforcement, slat gaps at or below approximately 3 inches, and solid-wood slats at least about 19 mm (3/4 inch) thick. Treat those as construction guidance, then apply any stricter mattress requirements.
Lay out the parts on a flat work surface before fastening.
Build in the order the load travels
-
Make the side assemblies rigid.
Clamp each side rail against its corner legs, keeping the intended top and bottom references aligned. Drill a clearance hole through the outer member and a centered pilot hole into the receiving member before installing structural screws.Prefer a housed or notched bearing arrangement where the rail can sit on a leg shoulder, rather than asking screws alone to carry the vertical load. Keep the rail straight while clamping and check each leg with a square before tightening. This prevents a twisted side assembly from forcing the finished frame out of alignment.
-
Connect the head and foot rails.
Fit the end rails between the side assemblies and clamp the rectangular perimeter together. Use bed-rail hardware, supported corner blocks, or another joint arrangement that transfers force into sound side grain rather than relying on screws driven straight into rail ends.Where you use bolts, fit washers against soft wood and leave the connection snug enough to adjust. Check the corners with a square and take a preliminary diagonal measurement. These connections resist racking, the sideways distortion that turns a rectangle into a parallelogram.
-
Install the center rail and its floor support.
Position the center rail lengthwise between the end rails and support its ends with appropriate bearing blocks or connectors. Set its top level with the side-ledger bearing surfaces, then fit the center leg so it contacts the floor without lifting the perimeter.Fasten the leg securely to prevent it folding sideways when the bed moves. The center rail must support the slats, not merely hang beneath them with a gap. This assembly prevents center-span deflection and reduces the bending demand on individual slats.
-
Fit and retain the slats.
Dry-fit the slats across the opening, checking that each end sits securely on its ledger and that the middle bears on the center rail. Use a spacer block based on the calculated clear gap, adjusting the layout if your mattress requires closer spacing.
Predrill and secure the slats against migration without driving screw heads too far, which can crush or split the wood. Check that knots, splits, or fastener holes haven't weakened a bearing point. Firm seating prevents a slat from rotating, slipping off its support, or taking an uneven share of the load.
-
Measure both diagonals.
Measure between matching reference points at opposite corners, then compare the diagonals. If they don't match, loosen the adjustable joints and shift the perimeter until they do.Don't use final screw torque to pull a badly aligned frame into shape. That stores stress in the connections and makes corner movement more likely during use.
-
Complete the fastening only after squaring.
Tighten connectors progressively while checking that the legs remain upright and the bearing surfaces stay aligned. Stop when the joint is seated firmly, not when the drill begins chewing the fibers.Keep every fastener accessible where possible. A hidden connection that cannot be inspected or tightened is a poor trade for a slightly cleaner underside.
Why bigger screws don't rescue weak joints
Joint geometry comes before screw diameter. A larger screw driven into a split board, shallow edge, or poorly fitted connection still leaves a weak joint.
APA's technical notes on fastener loads for plywood screws distinguish tested ultimate capacities from usable design loads. Don't turn a table value into a bed's advertised weight capacity, especially when the tested material and your joint are different.
Use a sharp bit and drill clean pilot holes. Spread the connection load across appropriately spaced fasteners rather than crowding screws together, and avoid unsupported plywood edges. Overtightening strips the fibers that provide holding power.
A screw should clamp a sound joint together. It shouldn't compensate for missing bearing support.
For a closer look at how the support surface interacts with its frame, our guide to a wood mattress base helps distinguish the base from the mattress above it.
Finish with a controlled load check. Apply weight gradually near the corners and center, keeping the load distributed rather than standing on an individual bare slat. Stop if you notice rail separation, permanent movement, cracking, or a leg lifting from the floor.
This is an assembly check, not a certified capacity test. Correct the connection or support problem before sleeping on the bed.
Stability Checks and Mattress Gap Limits
Solid wood isn't a stability guarantee. A thick frame can still rock on uneven flooring, and attractive slats can still leave unsupported areas beneath the mattress.
Start with the empty frame. Push gently across opposite corners to check diagonal rocking, confirm every leg bears on the floor, and use a level to distinguish an uneven floor from a twisted assembly. Adjust the support contact rather than forcing the rectangle down with extra screw torque.
Inspect each slat for cracks, bowing, and movement at its bearings. Then measure clear gaps at several locations, including beside the center rail, where a shifted slat may leave a wider opening.
Let the mattress warranty set the limit
The manufacturer's exact terms control, not a general claim that a frame fits a queen. Yawnder's comparison of mattress slat-spacing requirements identifies Saatva's less-than-4-inch platform gap rule and Brooklyn Bedding's treatment of gaps over 5 inches as improper support.
Mattress Firm's queen-frame slat guidance describes approximately 2–3 inches or less for foam and hybrid support and Sealy's stated 4-inch unsupported-gap limit. Sealy's warranty also requires at least five legs for queen systems, including rigid center support.
Mattress warranty gap and support limits
| Mattress or source | Maximum slat gap | Center support rule |
|---|---|---|
| Saatva platform beds | Less than 4 in | Center support for queen and larger sizes |
| Sealy (stated warranty conditions) | No more than 4 in unsupported gap | Center leg as rigid support |
| Brooklyn Bedding | Gaps over 5 in count as improper support | Confirm the current mattress warranty's requirement |
| Foam and hybrid mattresses (general guidance) | About 2–3 in or less | Follow the mattress manufacturer's center-support requirement |
These are screening criteria, not interchangeable permissions. For example, an innerspring mattress used with a foundation needs the foundation's frame requirements checked too.
Renters should inspect every connection after a move. Older adults and caregivers should assess the finished mattress height, not just the frame's appearance, because an extremely low bed may make transfers harder. Mattress Firm's foundation guidance also emphasizes planted supports and a stable outer structure rather than nominal capacity alone.
Our guide to bed-frame support slats can help when evaluating an existing support layout.
After one week, repeat these checks:
- Slat gaps: Measure for shifting.
- Leg contact: Confirm every support remains planted.
- Joint tightness: Correct looseness without stripping fasteners.
Decide Whether to Build or Buy Your Frame
The build-versus-buy decision starts with the mattress warranty, not the lumber aisle. If the warranty requires center support for a queen and caps slat gaps at a specific number, that rule belongs in the plan before you buy material or order a frame.
| Factor | Build Your Own | Buy Ready-Made |
|---|---|---|
| Upfront cost | Lumber and hardware for the cut list above | Compare the complete delivered price and warranty-compatible specifications |
| Time | A weekend, plus finish drying time | Delivery and assembly time only |
| Size control | Cut to your measured opening | Fixed by the manufacturer |
| Warranty fit | You verify center support and slat gaps yourself | Check the spec sheet against the mattress warranty |
Building makes sense when you have tools, a safe work area, and a reason to control the dimensions. Material costs can be lower, but buying tools, connectors and finishing supplies can erase the saving.
Buying makes more sense when you need a usable bed quickly or don't want to design structural joints. Before ordering, ask for the actual slat layout and center-support details rather than relying on lifestyle photographs. Slone Brothers Furniture's explanation of platform bed frame basics is useful for understanding how a platform differs from a foundation-based setup.
Reinforce when the frame is worth keeping
An intact perimeter with inadequate mattress support doesn't necessarily need replacing. Repair loose connections or damaged structural members first, then improve the support surface.
Our SlatSure Bunkie Board can serve as a box spring alternative or a reinforcement layer over wood slats, metal bars or an existing frame. Its listed USD prices are $131.99 for Twin (38 × 74 inches), $155.99 for Full (54 × 74 inches), $167.99 for Queen (60 × 79 inches), and $179.99 for King (76 × 79 inches). Match the actual support opening to the component dimensions before purchasing.
A supplemental support layer still needs sound structure underneath. It won't repair a broken rail or replace a missing center leg, and it shouldn't be used to hide a connection that continues moving under load.
If your existing bed combines wood and metal, our guide to metal-and-wood beds can help you assess the support arrangement before changing it.
Compare the mattress warranty against your measured cut list, then choose build, buy or reinforce. Keep a serviceable frame when a targeted repair will solve the problem; rebuild or replace it when the structure itself is compromised.
Meliusly designs furniture-support systems for sofas, recliners and sleeper sofas, along with bunkie boards and bed slats. Visit Meliusly to compare support options for your queen frame or find a fix for sagging furniture you want to keep.