

Recliner Chair Accessories for Comfort and Repair
Posted by Meliusly
Your recliner still opens, the footrest still comes up, and the upholstery looks presentable. But when you settle in at night, your hips sink into a hollow and you end up leaning to one side. Before buying another cushion or replacing the chair, find out what's no longer holding you level.
The right recliner chair accessories can address a specific wear problem. The wrong ones can cover a broken frame, interfere with the mechanism, or make a comfortable-looking chair harder to get out of.
Why the Chair Is Worth Accessorizing
Say your evening chair has developed a shallow dish in the middle. You straighten the throw, fluff the cushion, and sit down again, only to land in the same hollow. If the frame and reclining mechanism remain sound, that's a reason to inspect the seat support, not automatically discard the chair.
Keeping a familiar recliner has practical value. A comparative study of senior-friendly seating published in BioResources found that only 23% of respondents owned an armchair with a reclining function, yet 92% of those owners wanted to continue having a reclining or relaxation chair; 76% of people aged 60 and older also reported that armrests made sitting down and standing up easier.

Keep what still works
A familiar handle, usable armrests, and a backrest that fits your body are worth preserving. Accessories should protect those strengths while correcting the part that's worn.
There are distinct jobs to choose between:
- Restore the seat foundation. A compatible support board or firming insert addresses inadequate support beneath a cushion.
- Replace worn cushioning. Replacement foam addresses a cushion that remains flattened on a sound base.
- Improve everyday use. Fitted covers, reachable storage, and shaped back cushions address wear, access, or missing contact.
Mechanism repair kits belong in a separate category. They repair a named component rather than make the chair softer or more convenient.
Separate support from relaxation extras
Heat and massage accessories don't repair sagging or stabilize a seat. If you're considering them after resolving the chair's support problem, the SunnyBay guide to heated back massage offers useful context for that separate purchase.
Practical rule: An accessory earns its place by correcting a known problem without taking away a function you already rely on.
Which Accessory Matches the Fault
Recliner fault and the accessory to try
| Fault | Try this accessory | Skip it when |
|---|---|---|
| Seat dishes but the frame is intact | Firm support board or insert under the cushion | Frame is cracked or the board would jam the footrest |
| Foam is crushed on a solid base | Replacement cushion sized to compressed height | Added thickness lifts both feet off the floor |
| Fabric is stained or pilled | Fitted slipcover | Fabric bunches into hinges or the recline gap |
| Drinks or the remote are out of reach | Clamp-on cup holder or side caddy, no drilling | The clamp crosses a moving arm or lift path |
| Manual mechanism sticks | Model-specific spring, lever, or cable kit | The fault is a motor, wiring, or lift drive |
| Lower-back gap in the usual recline | Shaped lumbar cushion | It pushes the pelvis forward or creates one pressure point |
| Rental or shared chair must stay unaltered | Reversible board, pad, or cover | House rules ban any add-on or the piece cannot come off |
Read across the row that describes the fault, including the final column, before opening a product page. The exclusion matters as much as the recommendation. A support insert is a candidate only when the structure beneath it can safely carry the load.
Separate a weak base from worn foam
Remove the seat cushion if it's designed to come off. Look for displaced support, broken attachments, torn webbing, or a cushion that has permanently lost its shape. Don't cut upholstery or remove a fixed seat just to make a generic board fit.
A cushion can look healthy from above while its underside rests over a failing support surface. Conversely, firming the base won't restore crushed foam's contour. Our sagging chair support guide helps distinguish support problems from cushioning problems before you choose a fix.
For convenience accessories, inspect the attachment surface rather than the advertised capacity alone. A cup holder needs a suitable fixed mounting point, and a loaded organizer shouldn't pull upholstery into a moving joint.
Repair the fault, not the appearance
A cover can protect serviceable upholstery, but it won't correct a leaning seat. Likewise, a manual cable kit won't solve a chair that twists because its frame has loosened.
Repair-first decisions also avoid discarding usable furniture: Deutsche Welle's reporting on furniture waste cites 12.1 million tonnes of furniture waste generated in the United States in 2018, with less than 0.5% recycled. That's a reason to preserve sound furniture, not a reason to keep unsafe furniture in use.
Compare the complete repair cost, including any professional work, with replacement. A modest accessory makes sense for an isolated wear problem; several unresolved structural and mechanical faults call for a repair assessment before you spend anything on comfort extras.
How to Check Fit Before You Buy
Bring a tape measure, a straightedge, and the chair's model information to this job. Measure the occupied chair, because the unloaded cushion top doesn't tell you where your body sits.
Measure the sitter and the moving chair
- Record compressed seat height. Sit in the everyday upright position while someone measures vertically from the floor to the compressed seating surface beside your thigh. A review of aged-care seating research identifies approximately 430 mm as an optimal seat height for many older users, or about 470 mm with a footrest incorporated; these are reference points, not universal fitting dimensions.
- Compare the seat with lower-leg length. Check the distance from the floor to the underside of the knee while wearing usual footwear. Look for supported feet and relaxed thighs, not a cushion height chosen because it looks substantial.
- Map the accessory's footprint. Make a cardboard outline of a proposed board to check its stationary footprint while the chair is unplugged. Remove loose cardboard before operating the mechanism, then observe full travel from outside the moving parts; a flat template doesn't prove that a thicker product will clear every linkage.
- Check armrests and controls. The sitter should reach the remote and use the armrests without leaning across a moving joint. Read the chair label to establish whether it's manual, powered, or a lift-recliner, and obtain manufacturer clearance before adding an aftermarket board to a lift model.
Fit checks for a recliner accessory
| Check | Target | Why it matters |
|---|---|---|
| Compressed seat height | About 430 mm, or about 470 mm with a footrest, as reference points above | Higher seats can ease standing; excessive height reduces foot contact |
| Height versus lower-leg length | Close to the sitter's lower-leg length | A large mismatch can make rising harder |
| Foot placement | Both feet fully supported while seated upright | Helps maintain balance during the transfer |
| Recline and footrest path | Clear through full travel | Boards, covers, and trays must not obstruct hinges |
| Supported recline | A comfortable supported angle with continuous lumbar contact | Avoids leaving the lower back unsupported |
| Armrest and remote reach | Armrests usable and remote within easy reach | Avoids leaning across a moving arm or lift base |
Pass only when feet are flat, the seat is level, recline is unobstructed, and there's no new pinch point. If the proposed accessory fails, change the accessory rather than forcing the chair.
Confirm more than width
Measure the usable support deck, not just the visible cushion. Rounded fronts, attachment flaps, and rear gaps can make two similarly sized cushions incompatible with the same insert.
Record the proposed accessory's thickness and check its stated load limits and intended application. Don't improvise chair risers or assume that a product designed for a stationary sofa is automatically suitable for a recliner.
How Firmness and Lumbar Support Work Together
A dished cushion is like a favorite shoe that has gone flat: the cover can look fine while the structure underneath no longer supports you properly. Adding softness on top may change the first impression without correcting the underlying shape.
Seat firmness, back contour, and recline angle work together. A firmer foundation can limit sinking, but it can't fill a gap behind your lower back. A large lumbar pillow can fill that gap while creating another problem if it shifts your pelvis toward the seat edge.

Support the curve without forcing it
Cornell University's ergonomics guidance identifies supported recline angles of 110° to 130° as associated with low lumbar-disc pressure and back-muscle activity and favorable comfort ratings, while recommending contoured support that maintains the lumbar spine's natural curve.
That doesn't mean every recliner should be set to an identical angle. The useful fitting question is whether your lower back remains in comfortable contact when you settle into your normal reading or television position.
A shaped cushion should fill the gap rather than act as a wedge. If you feel a concentrated ridge, slide forward, or need to arch around it, reduce its thickness or try a different contour.
Firm isn't the same as hard
A compatible support board bridges an inadequately supported area beneath the cushion. The cushioning above still needs to distribute contact comfortably; a hard edge or uneven panel underneath can create a new pressure point.
Washable covers help with cleanup and protect upholstery from everyday spills, but they shouldn't be tensioned so tightly that they distort the cushion. Extra-soft toppers deserve particular caution because the sitter may compress them and have more difficulty rising.
More padding isn't an improvement if you have to fight your way out of it.
Test the whole sitting position
Try the accessory during a short, ordinary reading session rather than judging it immediately after sitting. Notice whether you keep shifting, whether your pelvis slides, and whether your back support disappears as you recline.
Then return upright, close the footrest, and stand using the armrests as you normally would. Keep the accessory only if your back remains comfortably supported and rising feels no harder than before; stop sooner if you develop pain, numbness, or instability.
How to Fit and Maintain the Add-On
Install only an accessory intended for the chair's construction. Keep children and pets away during fitting, and have another adult help if the chair must be moved or tilted according to its manufacturer's instructions.
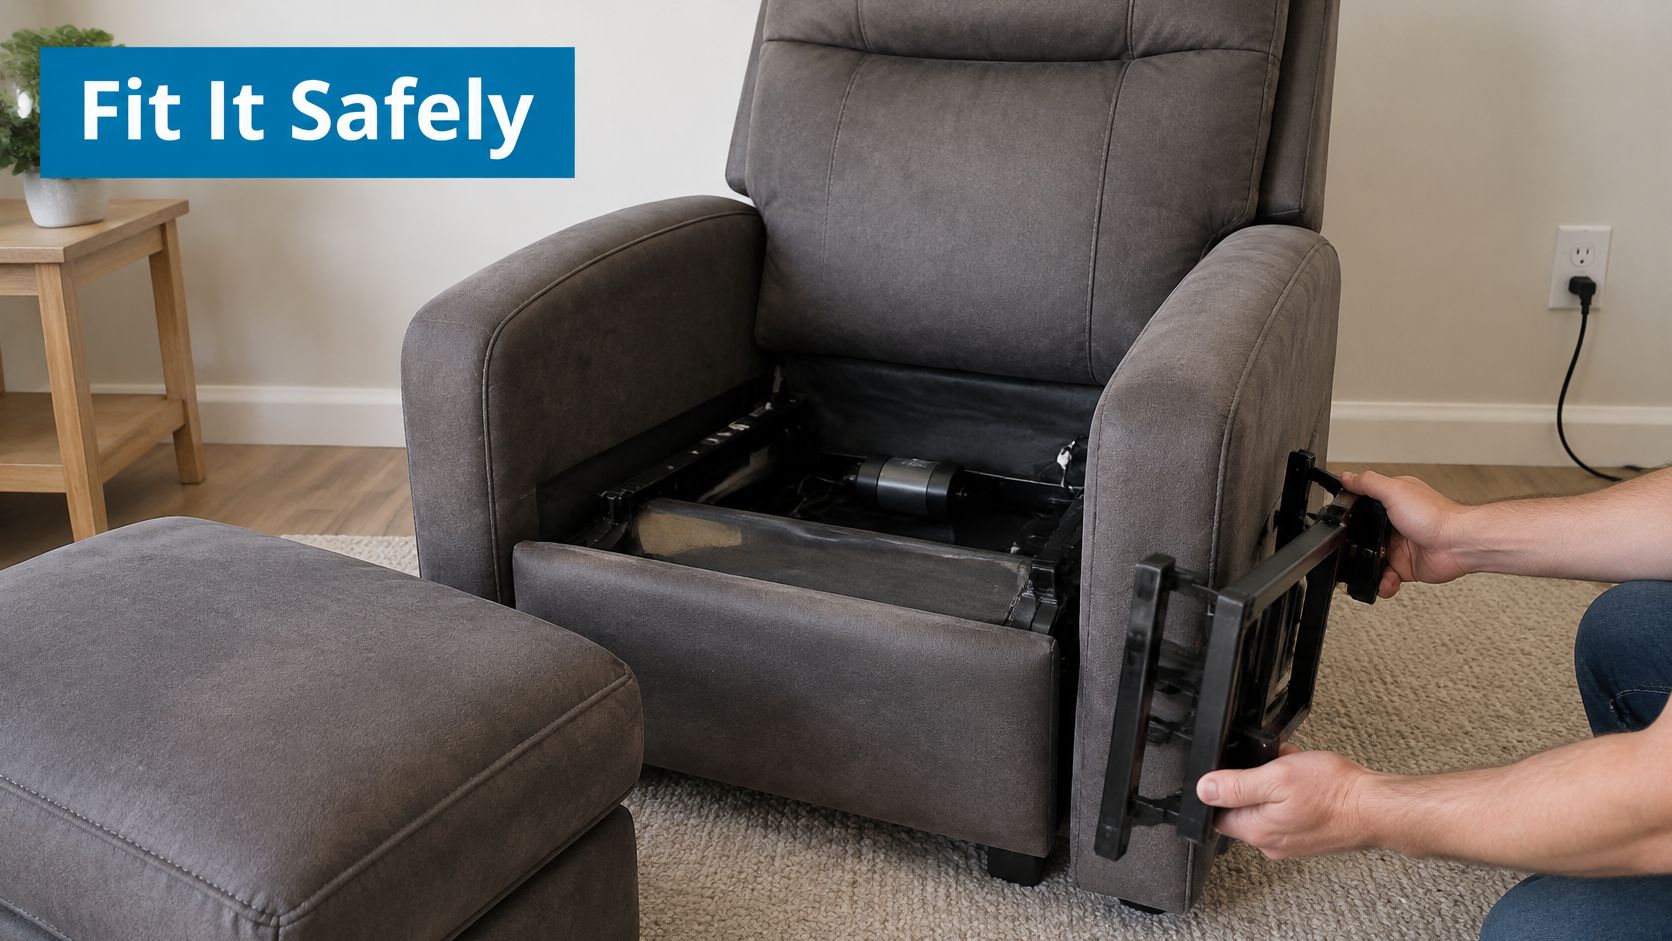
Fit in a safe order
- Disconnect power and remove loose cushions. Unplug a powered chair before reaching into accessible areas. Follow the manufacturer's isolation instructions for any battery backup, and never assume unplugging releases stored mechanical tension.
- Inspect the exposed seat pan. Vacuum crumbs and debris so you can see attachment points clearly. Torn webbing, a bent support bar, or a cracked frame means stop and arrange repair, not cover the damage with a panel.
- Position the support correctly. A compatible board belongs on its intended stationary support surface beneath the cushion, not across moving footrest bars. Check that its edges won't abrade upholstery; don't cut or modify a finished product unless its instructions expressly allow it.
- Replace the cushion and check stability. Before sitting, press across the cushion to detect rocking, a projecting edge, or a panel that slips into a gap. Then sit carefully and confirm that the support stays in place.
- Fit a slipcover upright first. Secure it using the supplied attachment method, keeping excess fabric away from linkages. With everyone clear, operate the chair and inspect for pulling or bridging; disconnect power again before adjusting fabric near the mechanism.
- Attach storage to an approved fixed surface. A clamp cup holder shouldn't crush upholstery, obstruct the arm pivot, or foul the lift path. Test travel empty before adding a drink, and keep the holder within its stated load limit.
- Treat manual repair kits as mechanical work. Replace only the model-matched component using the chair maker's procedure. Springs and linkages can store energy, so don't improvise a block-open method; use a qualified repairer if the procedure requires restraint tools or isn't clear, and verify locking before anyone sits.
Adjust back and neck accessories separately
Don't fit several posture accessories at once. Establish a stable seat first, then evaluate back support, and finally assess the head position so you can identify which change helps or causes discomfort.
Our recliner neck support pillow guide addresses that separate fitting decision. A neck cushion shouldn't force your chin toward your chest or compensate for a seat that lets your whole body slide forward.
Keep a simple maintenance routine
Check screws, straps, and clamps monthly, and clean removable covers according to their care labels. Remeasure compressed height if the seat begins dishing again, and stop using an accessory that shifts or develops a damaged edge.
Never oil a motor or open a lift actuator as routine maintenance. Electrical faults, damaged wiring, and unreliable lift operation need qualified service.
Renters Hosts and Caregivers
A chair in a rented apartment, a vacation property, and a caregiving household can need very different accessories. Choose for the person using it and the person responsible for maintaining it, not just for the chair's appearance.
Renters need a clean exit
A removable board beneath a loose cushion, a strap-on lumbar pad, and a fitted cover can make a practical non-permanent setup. Photograph the chair's condition before fitting anything, and retain its original components.
Check the lease or furniture agreement before attaching even a removable clamp. Pressure marks, stretched upholstery, and adhesive residue can still count as damage, so reversible should mean the piece comes off without leaving evidence.
Hosts need an inspection routine
For a guest chair, prioritize a removable spill cover and an appropriately rated support insert over a collection of unfamiliar gadgets. Keep controls obvious and avoid attachments that guests need instructions to move before standing.
Run a weekly recline test and include a visual check between bookings. A snagged cover, loose caddy, or footrest that no longer closes cleanly should be resolved before the next guest arrives.
- Leave controls visible. Don't tuck the remote into upholstery where a guest may sit on its cable.
- Use replaceable protection. Choose covers that staff can remove and refit correctly.
- Remove uncertain add-ons. If cleaners can't confirm an attachment is secure, take it out of service.
Caregivers need predictable transfers
Seat height deserves particular attention when someone has limited strength. The Journal of Rehabilitation Medicine paper on chair height and rising describes significant sit-to-stand differences in women over 55 across seats from 85% to 115% of knee height, and cites a comparison in which lowering the seat from 115% to 65% of knee-joint height increased maximum hip flexion moment by approximately 12% and knee flexion moment by approximately 100%.
Those joint moments describe mechanical demand, not an individual injury prediction. The practical lesson is that a yielding seat can require substantially more effort to rise from than its appearance suggests.
For a caregiving setup, keep the armrests uncovered where the person grips them and route all straps and cords away from the lift base. Avoid loose throws that can fall beneath the chair, and don't add grab handles unless the chair and attachment are designed for that purpose.
Caregiver checkpoint: Reject an accessory that introduces slipping, an extra pull, or a new loss of balance during standing, even if the chair feels plusher.
If transfers are already difficult, have an occupational therapist or other appropriate clinician assess the occupied chair. A general comfort accessory isn't a substitute for an individualized seating or pressure-management plan.
Decide to Repair or Replace the Recliner
A chair is worth keeping when its frame and mechanism work correctly and the problem is limited to cushioning, upholstery protection, reach, or missing back support. A technician may be able to repair a specific failed part, such as a model-matched spring, lever, or cable.
Stop using the chair until it has been assessed if the frame is cracked, the mechanism will not lock, or a powered or lift function behaves unpredictably. A comfort accessory cannot make a faulty mechanism safe. Replace the chair if a proper repair is not viable or it cannot provide a stable transfer.
Buy for the measured construction
For loose cushions, measure each cushion's length and width, then check the usable support deck. Any board must rest on the chair's weight-bearing area without interfering with the footrest assembly.
Meliusly's Heavy Duty Sofa Cushion Support Board is a couch support for sagging cushions and is on sale for $29.99. It may suit compatible loose-cushion construction, but it is not a universal recliner repair. Check the product's listed specifications against your measurements, and make sure the chair's moving parts have clear space.
Compare the complete cost
Count replacement foam, delivery, installation, and any mechanical repair when comparing an accessory with a replacement chair. Repeated cushion purchases won't fix an unresolved structural problem.
For rented or shared furniture, choose a permitted, reversible solution and keep the original parts. Buy only the smallest compatible add-on that restores useful support. Visit Meliusly to compare support options with your chair measurements and choose a compatible fix for furniture with a sound frame.
Share this post
- Tags: furniture repair, recliner chair accessories, recliner comfort, sagging recliner, seat support