

How to Recover a Chair Seat: Fix the Base First
Posted by Meliusly
The usual advice on how to recover a chair seat starts with choosing fabric and pulling staples. That's the wrong starting point if the seat sags. New upholstery can hide slack webbing, a cracked board or loose joints without making the chair safer or more comfortable.
Start underneath. Restore the support, keep the cushioning that still works, and choose a cover that suits the people using the chair.
Diagnose the Seat Before You Recover It
Press across the seat with both hands, comparing the centre, edges and corners. A soft patch beneath resilient padding points toward uneven support; a cushion that stays compressed suggests worn foam. Don't sit-test a chair that already rocks, cracks or shifts.
Turn the chair over and inspect the webbing, springs, corner blocks, brackets and fasteners. The VI Reupholstery guide to office, clinic and public seating recommends examining the frame, support deck, foam and underside before selecting replacement materials. Tighten loose screws only where the surrounding wood still holds them securely.
Museum conservation records from the Museum of Fine Arts, Boston describe seats whose deteriorated under-support allowed filling to drop through, collapsing the front and side edges. Fabric wasn't the failed component. The platform beneath it was.
Seat Symptoms, Causes and Actions
| Symptom | Likely cause | Action |
|---|---|---|
| Seat dips in the centre or feels bouncy | Slack webbing or weakened springs | Re-web or re-tie springs before covering |
| Front edge collapses and filling sits low | Failed webbing or under-support | Rebuild the support deck and keep sound springs |
| Foam crumbles, stains or stays flat | Degraded foam | Replace foam and cover it with batting |
| Seat is level and firm, only the cover is worn | Surface wear | Recover, after tightening fasteners |
| Seat board cracks, splits or flexes | Failed seat board | Repair or replace the board |
| Chair wobbles at the joints | Loose or failing frame | Re-glue and tighten, or retire the chair if the frame has failed |
Gently flex an exposed seat board without forcing it. Look around mounting holes for splits, and investigate water staining for softened wood or separating layers. Our sagging chair support guide helps distinguish cushioning problems from inadequate support.
Practical rule: Surface wear calls for recovery. Failed padding or suspension calls for rebuilding first. A damaged frame needs a structural repair or retirement.
Choosing Fabric by How the Chair Gets Used
Choose upholstery fabric by use, not colour alone. The wikiHow dining-chair upholstery guide describes light upholstery as below 15,000 Wyzenbeek double rubs, and medium upholstery as 15,000 to 30,000 or more for private spaces used for a few hours daily.
Daily seats endure sliding and weight shifts that chair backs don't. The Palmetto Upholstery abrasion guide gives practical targets of 15,000 or more for normal residential seating, 30,000–50,000 for heavy residential use, and 50,000–100,000 or more for high-turnover settings.
Abrasion Targets by Chair Use
| Chair use | Wyzenbeek double rubs | Practical note |
|---|---|---|
| Decorative chair backs or occasional seating | Below 15,000 | Light-duty; not for a seat used daily |
| Normal daily residential seating | 15,000 or more | Practical minimum for everyday seats |
| Heavy residential use, such as dining chairs | 30,000 to 50,000 | Seats wear at the front edge first |
| Hospitality or high-turnover seating | 50,000 to 100,000 or more | Confirm the rating with the supplier |
| Caregiver or infection-control settings | Rating plus wipe-clean verification | Confirm the cleaner suits the coating |
Rub counts are comparative benchmarks, not lifespan guarantees. Weave, fibre, backing, cleaning chemicals, sunlight, pets and concentrated edge wear affect the result. Abrasion resistance doesn't establish stain resistance or cleanability.
For help comparing constructions, Guynn Furniture & Mattress's guide to understanding upholstery fabric is a useful starting point.
- Household dining: Prioritize spill removal and a tightly woven surface.
- Pets: Avoid open weaves and exposed loops that claws catch.
- Allergy-sensitive rooms: Prefer surfaces you can vacuum thoroughly; plush fabrics retain dust.
- Vacation rentals: Check approved cleaners and drying requirements between guests.
- Caregiving: Consider wipe-clean coatings and a stable, low-slip feel. Upholstery alone doesn't resolve transfer or fall risks.
Tools and Materials to Gather Before You Start
Gather tools before dismantling the seat. Leaving loose layers on the bench while you shop makes it easier to lose orientation marks, hardware and usable pattern pieces.
Gather in Buying Order
- Check what you own: A flat screwdriver or upholstery tack lifter, needle-nose pliers, staple remover, tape measure, marker, utility knife and camera. Add sharp fabric scissors, eye protection and a container for removed staples.
- Buy after diagnosis: A manual staple gun and compatible staples, replacement jute webbing, a webbing stretcher, foam and batting as needed. Match staple length to the receiving wood and covering thickness so the legs won't emerge through the seat.
- Wait for the fabric decision: Upholstery fabric, matching welt cord if you're retaining piping, and cardboard tack strip or a suitable thin wood strip where the construction requires a finished edge.
Test the staple gun on a concealed area or matching scrap. Staples should sit flush without cutting through the fabric or splitting the wood.
Don't buy replacement foam just because you've removed the cover. Keep a clean, resilient cushion that still gives even support.
Use a clean, flat work surface with room to turn the pad over repeatedly. A helper can hold wider fabric square while you check alignment, but only one person should control the tension at a time.
How to Strip the Old Cover Without Losing the Pattern
Remove a detachable seat pad using its actual mounting screws, not every screw visible beneath the chair. Keep the hardware labelled and photograph the mounting arrangement before separating it.
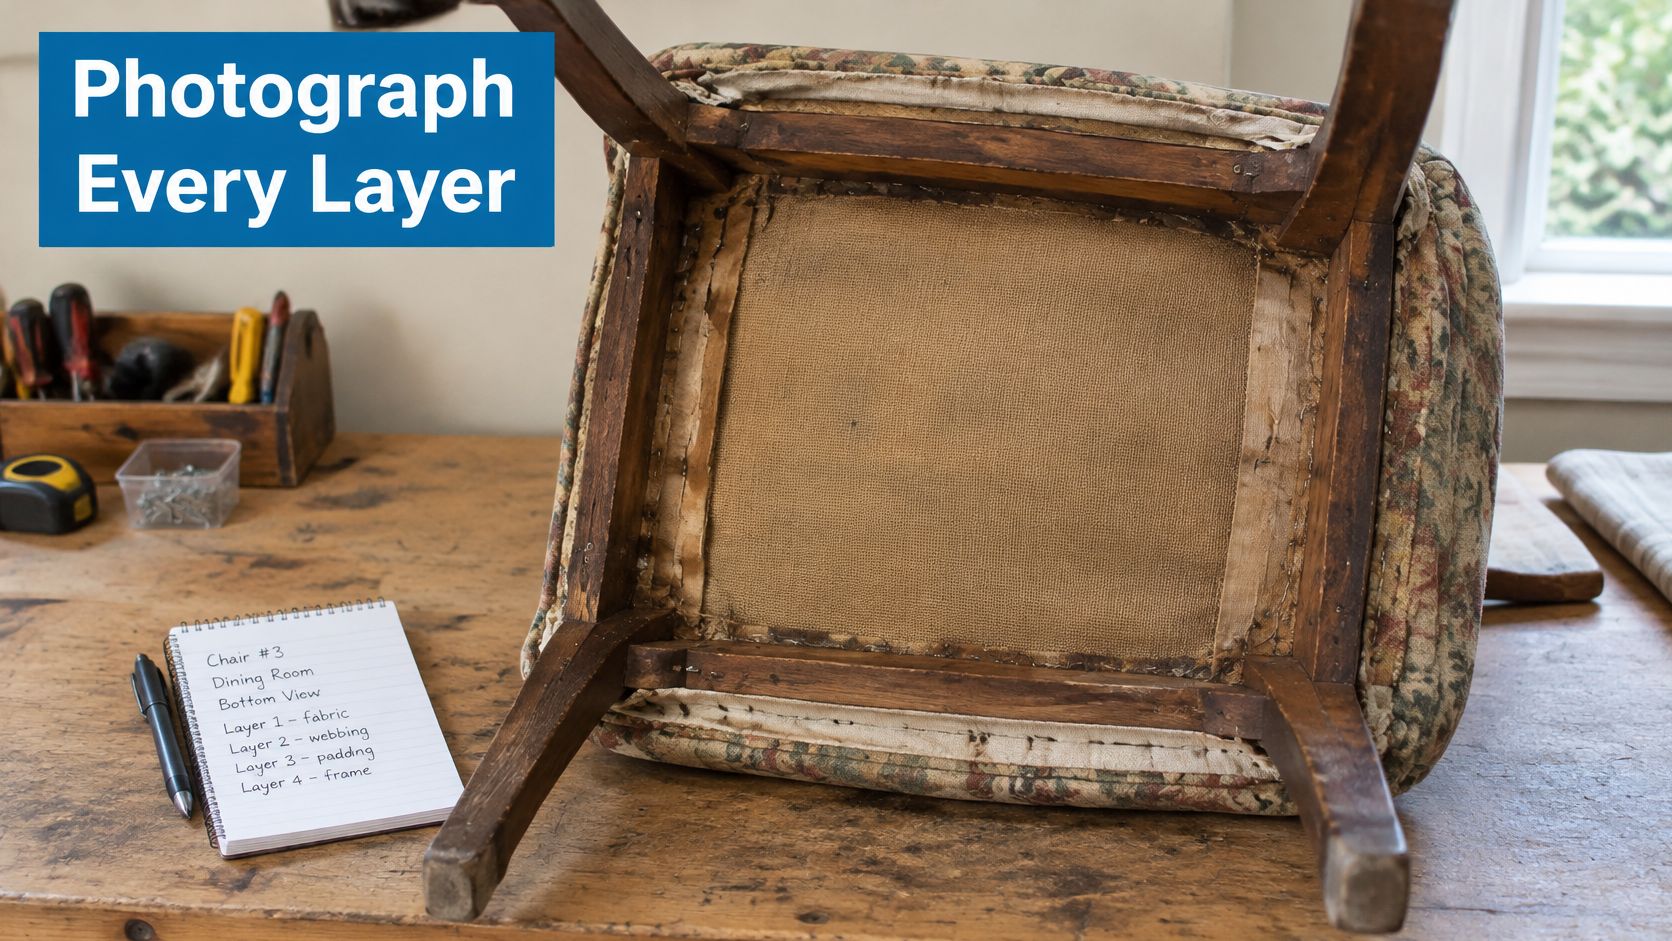
Remove Layers in Order
- Record the construction. Photograph the underside, edge details and each newly exposed layer. Label front, rear and sides directly on the removable pieces so their orientation survives handling.
- Remove trim, welt and tack strip carefully. Start lifting cover staples at an accessible corner, supporting the tool against sound material rather than levering hard against a thin rail.
- Pull each staple completely. Raise the crown, grip it with pliers and withdraw it. Don't snap it off and leave sharp legs where the next staples need to go.
- Keep the cover intact. Mark grain direction, pattern placement, notches and corner folds before laying it flat; those details help reproduce the original shape.
- Separate cushioning from support. Lift batting and foam gently, keeping reusable pieces apart from material that's stained, compressed or crumbling. Note how the foam was shaped around the edge.
- Expose the webbing and springs without immediately undoing them. Photograph attachment points and spring ties, then remove loose debris and protruding staple fragments so you can inspect the rails.
If the construction involves fitted cushion covers or sewn panels rather than a simple wrapped pad, Willis Furniture & Mattress explains the broader work involved to rebuild cushions and replace worn covers. Recognize that extra sewing work before cutting valuable fabric.
The most common stripping mistake is driving a screwdriver beneath the fabric and gouging the rail. Split wood won't hold new staples reliably. Another expensive mistake is discarding the old cover before checking its dimensions, especially on shaped seats.
How to Repair Webbing, Foam and Batting
New fabric cannot fix a failing seat base. Check the exposed support first, then rebuild the cushion to fit it. A solid-board seat does not need webbing, and replacing a sprung seat with a rigid board can change how it supports weight.
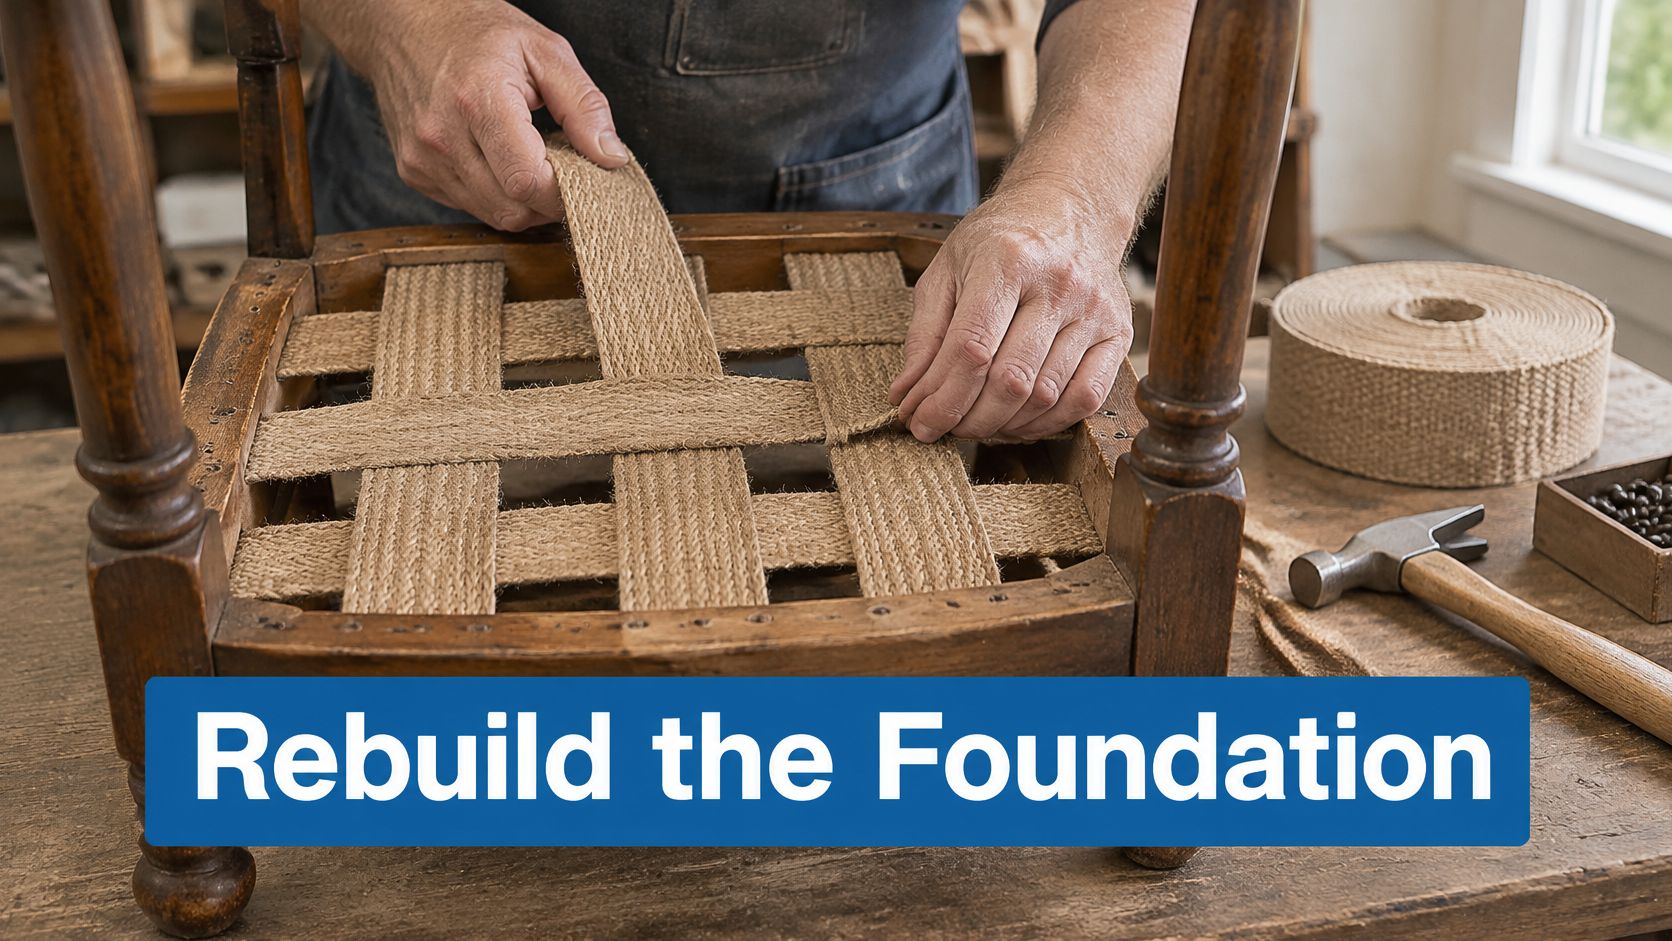
Restore the Suspension
- Replace failed strips with matching construction. The Reupholstery.ae chair guide specifies 3.5-inch jute webbing, woven front-to-back and side-to-side with approximately 1.5–2 inches between strips. It also recommends folded-back ends secured with at least five staggered fasteners. Match the existing layout where possible, since webbing width and spacing affect how the seat carries weight.
- Stretch webbing with a webbing stretcher rather than pulling it by hand. Fasten one end, tension the strip, then secure and fold back the other end. The support should feel firm without twisting the frame. Weave crossing strips over and under the first set.
- Stabilize rails and spring attachments. Clean and re-glue suitable loose joints, then clamp them until the adhesive cures. Replace missing original screws or brackets where appropriate. Extra screws will not repair a split joint. Leave broken springs or unfamiliar tie arrangements to an upholsterer.
Rebuild the Cushion Profile
- Choose foam by both density and firmness. Density helps indicate durability, while firmness describes how much the foam yields under the sitter. Higher density does not automatically mean a harder feel. The guide gives residential foam densities around 1.8–2.0 lb/ft³, or 2.0–2.5 lb/ft³ high-resilience foam for heavily used seating.
- Trace before cutting. Use the seat footprint as your starting pattern and keep the intended edge profile. Add foam only where its thickness and fit require it. Too much overhang makes the pad bulky and difficult to fit into the frame.
- Lay batting over the foam and smooth it down the sides. Fasten at the middle of opposing sides, work outward, and trim it to a modest margin beyond the staple line. Finish the corners without bunching material beneath the board.
Batting rounds the foam shoulder and helps the cover slide into position without catching. It cannot restore a core that stays flattened after compression, so replace that foam. Check the rebuilt pad in its frame before adding fabric. This chair cushion pad guide can help you assess whether discomfort comes from the cushioning or the seat support.
How to Cut and Attach the New Cover
The seat base comes before the fabric. Measure the widest and deepest parts of each section, then record them before calculating yardage. Check the old cover against the rebuilt pad, since stretched fabric or changed padding can make it an unreliable template.
Typical construction allowances are roughly 1 inch for seams, 4 inches at seat-piece sides, 8 inches for an apron that extends onto the seat, 2 inches at outside-piece bottoms, and at least three-quarters of a yard for cording. Your pattern may need more, depending on how the pieces meet and where they fasten.
Fabric Allowances for a Recovered Seat
| Fabric area | Extra allowance | Why it matters |
|---|---|---|
| Seams | 1 inch | Leaves fabric for seam finishing |
| Sides of a seat piece | 4 inches | Wraps around the foam and seat platform |
| Apron or front piece extending onto the seat | 8 inches | Tucks beneath the adjoining section |
| Bottom of outside pieces | 2 inches | Allows the piece to be stapled underneath |
| Cording | At least 3/4 yard | Covers the welt or cord trim |
Use only the allowances that match your construction. A removable dining pad does not need every allowance in the table, and an old cover that already includes a wrap should not receive that allowance a second time.
Attach from the Centres
- Dry-fit before cutting. Drape the fabric over the finished cushion and check that it reaches the underside fastening area. Confirm the pattern direction and nap. Keep sewn joins away from the compressed front edge.
- Lay the fabric face down on a clean surface. Centre the padded board over it. Mark matching centres on the fabric and on the front, back and side edges of the board's underside.
- Set the anchors. Put one staple at each centre, alternating between opposite sides. Turn the pad over and check the pattern before adding more staples.
- Work outward from the centres in short runs, switching sides regularly. Pull firmly enough to remove slack, but stop before the cushion edge flattens or a stripe bends.
- Leave corners until the sides are stable. Fold square corners into controlled pleats or mitres. On curved corners, distribute smaller folds evenly. Keep excess fabric underneath the pad, not on its visible face.
- If the original construction calls for a tack strip, use it to form the finished edge. Staple into sound material at close, consistent intervals beneath the trim.
- Inspect before finishing. Check symmetry from standing height, then refit and secure the pad. Sit on it to check for shifting or wrinkles, and adjust the tension before installing welt or decorative trim.
Trim should conceal the attachment, not conceal a fitting mistake.
Stapling continuously around the perimeter pulls the cover off-centre and leaves the final side fighting the first. With stripes or directional motifs, keep checking the fabric face as you work. A leaning pattern is harder to correct once every edge is fixed.
Fix Finish Problems and Decide to Recover or Replace
Most finish faults need a local adjustment, not a new cover. Remove only the affected staples, correct the cause, then refasten.
- Corner wrinkles: Release nearby fasteners, rebalance tension from the centres and refold the excess.
- A shifting seat: Check the mounting screws and confirm the staples grip sound wood.
- A puckered front edge: Ease excessive tension rather than pulling harder elsewhere.
- Unequal side tension: Release the tight edge and work alternately across opposing sides.
- Renewed dipping: Inspect the support platform. Tightening the cover will not repair a failing base.
Keep Sound Parts, Replace Failed Ones
Recover the chair when its frame, springs and board are sound, and the materials and labour make sense compared with replacement. Failed rails, irreparable board damage or joints that will not hold call for a professional rebuild or retirement. If the repair is uncertain, compare an assessment from a furniture repair shop with local labour costs. ShamFix can help homeowners get handyman quotes for suitable repair work.
Refurbishment can keep serviceable components in use rather than replacing them automatically. A peer-reviewed Journal of Industrial Ecology study, reported by Earth911, found refurbishment preserved 75.3% of the total weight of one chair and 83.7% of another.
If the upholstered seat is structurally sound but still needs firmer support, consider suspension repair or a correctly fitted removable support layer. Meliusly offers sofa cushion support boards, recliner chair supports, and foldable and permanently installed sleeper sofa support boards for furniture sagging. Check dimensions before buying, and do not use a support board to hide a broken frame. Once the structure is sound, visit Meliusly to compare support options.
Share this post
- Tags: chair seat foam, chair seat repair, how to recover a chair seat, reupholster dining chair, upholstery webbing