

Furniture Repair Kit: Choose, Fix, or Support
Posted by Meliusly
You sit down on your usual spot on the sofa and two things bother you at once. The wooden arm has a pale scratch, and the cushion sinks lower than it did last month. You open a furniture repair kit hoping one box will handle both.
It won't. The scratch lives in the finish. The sink lives under your weight, in foam, webbing, springs, or the deck. Learning to separate those two jobs is what saves you money and keeps a small repair from making a sound piece worse.
What Your Furniture Repair Kit Can Actually Fix
Start with that two problem sofa. The scratch on the arm doesn't change when you press it. The cushion does. That difference decides everything about a furniture repair kit.
It's normal to try the box first anyway. In the 2024 Allstate Protection Plans survey reported by The East Oregonian, 43% of respondents said they tried to fix damaged furniture themselves, while the average cost of repairing or replacing damaged sofas, couches, and loveseats was $299. That's why a small kit feels sensible. It's sensible only after triage.
Three Kinds of Defect, Three Different Answers
A finish mark sits on or in the surface coating. Wax, a marker, or a light rub can make it less visible because nothing structural has moved.
A joint problem moves. A chair rung wiggles, a table leg rocks, a rail creaks when you lean. Glue and clamps can restore contact between two wood faces, but color alone can't.
A support problem changes shape under a person. The seat drops, the sleeper mattress reveals metal bars, the bed sags between slats. No filler, marker, or polish pushes back against body weight.
The press test: Press the defect with your hand, then sit or lean as you normally would. If the shape yields across a seating or sleeping area, stop and inspect the frame or foundation first.
What to Use for Each Furniture Defect
| Defect | Kit method | Stop if | Better path |
|---|---|---|---|
| Shallow scratch in solid-wood finish | Wax stick, marker, or nutmeat rub | Veneer is sanded through | Hidden test, then color match |
| White water or heat ring | Light 3/0 steel wool after wax removal | Mark is in laminate or plastic | Finish-specific cleaner only |
| Small gouge in solid wood | Filler, then color | Board is particleboard or MDF | Fill only if the core is sound |
| Loose wood joint | Thin wood glue and clamps | Rail is cracked or unsafe | Dowel or pro frame repair |
| Small woven-fabric tear | Heavy thread or a patch | Foam or webbing has failed | Fix support before the cover |
| Leather scuff | Color compound and topcoat | Seam is split or foam is crushed | Restitch or replace the cushion |
| Sagging sofa cushion or deck | None | Shape drops under a sitter | Cushion or deck support board |
| Sleeper bars felt through mattress | None | Metal bars show under load | Sofa-bed support board |
| Wide bed-slat gaps | None | Slats under 3 in or gaps over 4 in | Bunkie board or closer slats |
Read the table top to bottom and notice where the word None starts. That's the line between cosmetic work and load work. A scratch, a white ring, and a small gouge are all about color and surface level. A loose joint is about contact and clamping. A fabric nick is about holding edges together.
Below that line, the failure involves weight. Compressed foam won't regain height because you colored the fabric over it. Broken webbing won't hold a sitter because you stitched the cover tighter. The cover just takes the strain and tears again, usually at the same seam.
Run the Check Before You Open Anything
- Press and watch: Put your weight where people sit and watch whether the dip is local or spans the whole seat.
- Wiggle each joint: Grip legs and arms and move them gently. Movement at a joint means glue work, not touch up work.
- Feel underneath: Turn the piece or reach under cushions and feel for loose webbing, flat foam, or a deck that gives with light pressure.
- Check edges for material: Look at exposed edges and undersides to see what you're working on before you sand or fill.
Say your chair has a worn spot on the front rail and a leg that shifts when you stand. Fix the leg first. Every shift opens the finish at the joint, so coloring first means coloring twice.
The kit earns its place on the scratch, the ring, and one sound loose joint. It doesn't earn its place on a seat, sleeper deck, or bed that changes shape under normal weight. That single distinction prevents most wasted kits.
Match the Kit to the Finish and the Damage
Store shelves group kits by promise. Your furniture doesn't care about the promise. It cares what it's made of and how deep the damage goes.
Identify the Surface Before You Buy
Solid wood shows grain that runs through the edge. A drawer side, table edge, or chair leg looks like one piece from face to end because it is.
Veneer shows a thin face with a visible core line at exposed edges. That face can be very thin, so sanding is risky. You can go through it before the scratch disappears, and then no marker will recreate the grain.
Laminate repeats a printed pattern. Look for identical grain figures repeating across a panel and a hard, plastic feel. Particleboard and MDF show chips or crumbling at cut edges, screw holes, and worn corners. They don't hold filler or screws the way solid wood does.
Furniture Repair Kit Types and Where They Belong
| Kit type | Typical contents | Use on | Do not use on |
|---|---|---|---|
| Wood touch-up | Wax sticks, markers, filler | Solid-wood scratches and small gouges | Thin veneer, plastic laminate |
| Finish revival | Polish, 3/0 steel wool, light oil | Oil or wax finishes and white rings | Raw engineered board, laminate |
| Joint and frame | Wood glue, dowels, corner braces | Loose solid-wood joints | Crumbling particleboard |
| Upholstery mini | Needles, heavy thread, patches, fabric glue | Small tears in woven fabric | Thick leather or vinyl as a first project |
| Leather color | Filler, dye compound, clear topcoat | Surface scuffs on dyed leather | Split seams or crushed foam |
A wood touch-up kit belongs on solid wood with shallow damage. A joint kit needs glue, dowels, and braces, not just color sticks. If a box promises to fix a wobbly chair with markers, leave it on the shelf.
For leather, routine cleaning and conditioning matter more than most color work, and the Enky Journal guide to keeping leather furniture in good condition is worth reading before you put dye on a worn arm. Condition can't fix a split seam, but dry, dirty leather takes color unevenly.
Two Finish Recipes That Actually Match the Damage
The right method depends on whether the damage affects only the finish or has reached the wood itself, as a Michigan county repair guide on making simple repairs to wood furniture explains. For minor scratches on naturally finished wood, it recommends rubbing small pieces of walnut, pecan, Brazil nut, or butternut diagonally along the scratch until it darkens.
For oil-finished surfaces, the same guide recommends a 3/0 steel-wool pad with a light oil, followed by wiping with the grain and removing residue with a dry cloth. For white marks commonly caused by water or excessive heat, it suggests light rubbing with 3/0 steel wool after removing surface wax where necessary.
Notice how gentle both recipes are. Neither starts with sandpaper. Neither floods the surface. You test in a hidden spot, work with the grain, and stop as soon as the mark blends.
Don't sand veneer to chase a scratch, and don't treat laminate or crumbling particleboard like solid hardwood. If old paint might contain lead, don't sand or heat it.
Work in ventilation, keep dust down, and protect your eyes and skin. Lay oil-soaked rags flat outdoors to dry or store them in a sealed metal container, because bunched oily rags can self-heat.
Deep damage needs a different answer than a shallow mark. Once you can feel missing wood, loose layers, or movement, you've left touch-up territory.
How to Reinforce a Loose Frame Joint
A dining chair rocks when you lean back, but the rail isn't cracked. That wobble is the signal for glue and clamps. A repair kit won't help a joint that isn't loose, and clamping a broken rail won't make it whole. Confirm movement first: a rail rocks, a leg shifts, a chair twists under lean.
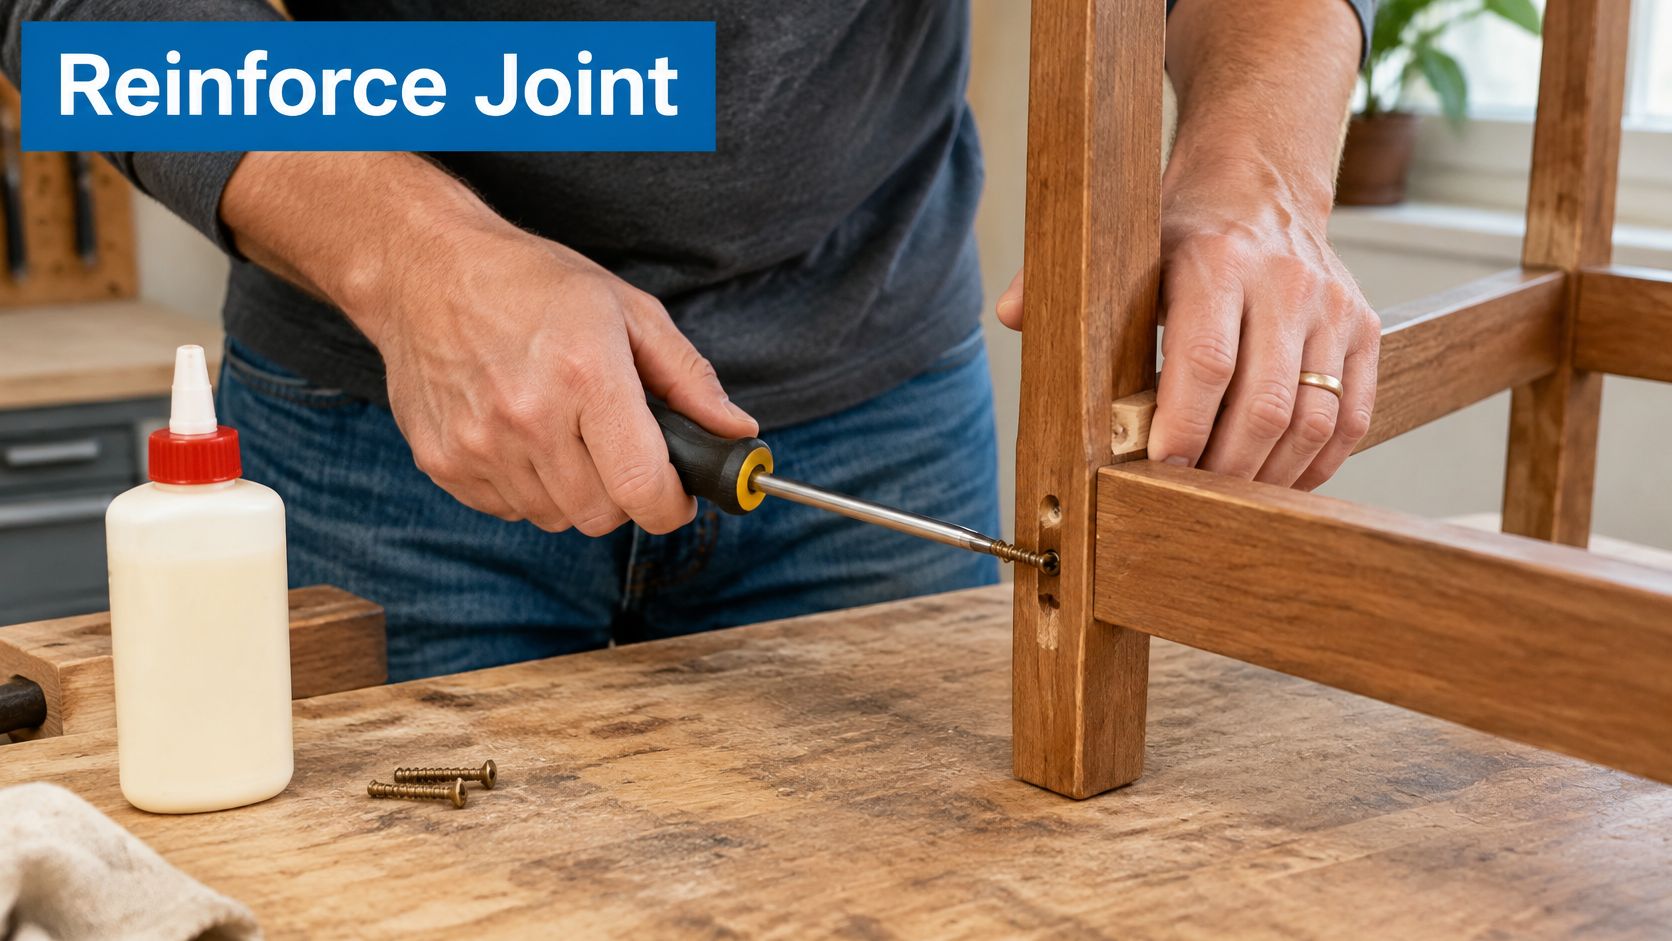
Preparation decides whether the repair holds. The LSU AgCenter guide on glues and gluing wood makes the point that success depends more on joint preparation and clamping than on adhesive quantity. Keep that in mind at every step. More glue never fixes dirty wood.
The Repair in Order
- Empty and photograph the piece: Remove cushions and drawers, then photograph the joint and hardware so screws return to the same holes.
- Dry-fit the parts: Push the joint together without glue and confirm it closes fully and sits square.
- Clean to bare wood: Scrape out old glue, dust, and finish from the mating faces so fresh adhesive touches wood, not contamination.
- Apply a thin film: Spread a continuous but thin layer on both mating surfaces. A thick pool squeezes out and leaves a weaker line.
- Align and clamp with cauls: Place flat scrap blocks, called cauls, under clamp jaws so metal doesn't dent the show face.
- Set pressure by wood type: Tighten until the glue line closes evenly. Softwoods dent before they need more force, so use cauls and stop before the wood crushes. Dense hardwoods can take more clamp pressure, but even contact matters more than force.
- Space and alternate clamps: Place bar clamps evenly along the joint and alternate them above and below the panel or rail to limit bowing.
- Wipe squeeze-out wet: Lift wet glue with a damp cloth or scraper now, because dried glue blocks stain and finish later.
- Honor the cure: Leave clamps on for the minimum time on the label, then keep weight off the piece until full strength develops.
Pressure, Spacing, and Cure Times
Clamping is about even contact across the whole glue line, not about tightening until something creaks. Clamping only at the visible ends leaves the middle starved and slightly open, and that open middle is where the joint fails next season.
Cure time confuses people because two clocks run at once. The clamp time on the adhesive label is the minimum time the joint must stay closed under pressure. Full strength develops later, so keep weight off the piece longer than the clamp period. Temperature, wood species, moisture, and joint fit all shift those times. Don't test the chair by sitting on it that evening. Let it stand unloaded overnight at minimum.
Gap rule: If the dry-fit wobbles with visible space between faces, glue alone won't bridge it. Add a dowel or spline to restore wood-to-wood contact first.
Mistakes That Shorten the Repair
- Skipping cauls: Bare clamp jaws dent softwood and leave marks that need more repair than the joint did.
- Gluing over old finish: Adhesive bonds to the finish layer, and the finish lets go under load.
- Removing clamps early: The joint feels firm while it's still weak inside, and one sit shifts it out of square.
Say a dining chair leg pulls out cleanly and the socket looks glazed. Scrape that glaze to fresh wood, dry-fit, and check for rock. If the tenon is undersized, wrap it with a thin veneer shim or fit a dowel rather than flooding the socket.
Stop and call a professional when a load-bearing rail is cracked through, when you find mould or pest damage, or when the piece feels unsafe to sit on even before you start. A kit joint repair restores a sound loose joint. It doesn't rebuild broken structure.
Support Sagging Seats and Bed Frames
A repair kit can't push a sagging deck back into shape. If the surface drops when someone sits or lies down, you need something that carries weight, not something that changes color.

Run the Sit Test and the Tape Test
Sit in the usual spot and have someone watch, or sit and note where your hips land compared with the arm height. Does one cushion drop, does the whole deck tilt, or do you feel a hard bar through a sleeper mattress? Each answer points somewhere different. One low cushion suggests compressed foam. A broad dip suggests webbing or springs. A hard ridge suggests the sleeper mechanism carrying load it shouldn't.
Beds give you numbers instead of impressions. For a slatted bed used without a separate foundation, Sealy's published warranty requirements specify that each cross-slat must be at least 3 inches wide and spaced no more than 4 inches apart. Measure the actual slat width and the clear distance between slats rather than judging by eye.
Wider gaps leave portions of the mattress insufficiently supported, and undersized slats can flex or fail under load. Check your own mattress manufacturer's requirements before you change the foundation, because warranty rules come from the maker, not from the frame you happen to own.
Match the Support to the Failure
- Sagging sofa seat: A flat, rigid panel under the cushions restores one plane so foam stops folding into a soft deck.
- Sleeper bars felt through the mattress: A board laid over the bars spreads body weight across the mattress instead of concentrating it on metal.
- Wide bed-slat gaps: A bunkie style layer over the slats closes the gaps so the mattress rests on a continuous surface.
- One tired cushion: Replace or supplement the foam itself, because a firm deck under flat foam still feels flat.
For a step by step look at how a panel changes the sit, the guide to choosing a couch support board walks through measuring the cushion bay and fitting the board. Measure width between arms and depth from front rail to backrest before you order anything. A board that's too narrow slides, and one that's too deep lifts the cushion front edge.
A support board or bunkie-style panel can be useful when an existing frame has excessive spacing, provided the added support is compatible with the mattress and frame design.
Fit matters at the edges. The support should rest on the frame or deck, not balance on cushion foam. On a sleeper, it should lie flat without forcing the mechanism, and the bed should still fold as designed if the product is meant to stay in place.
Once the shape is stable, use the kit only for finish marks you can still see. That's the correct order. Support first, cosmetics second, because a firm deck stops the movement that cracks filler and opens seams.
If the frame is broken, mouldy, or unsafe, no support product will make it sound. Get a professional assessment instead of bridging over a failure that could collapse.
How to Touch Up Upholstery With a Small Kit
Keep this to an evening touch-up. You're closing a popped seam or patching a small hole on a seat that still supports you. You're not recovering a sofa.
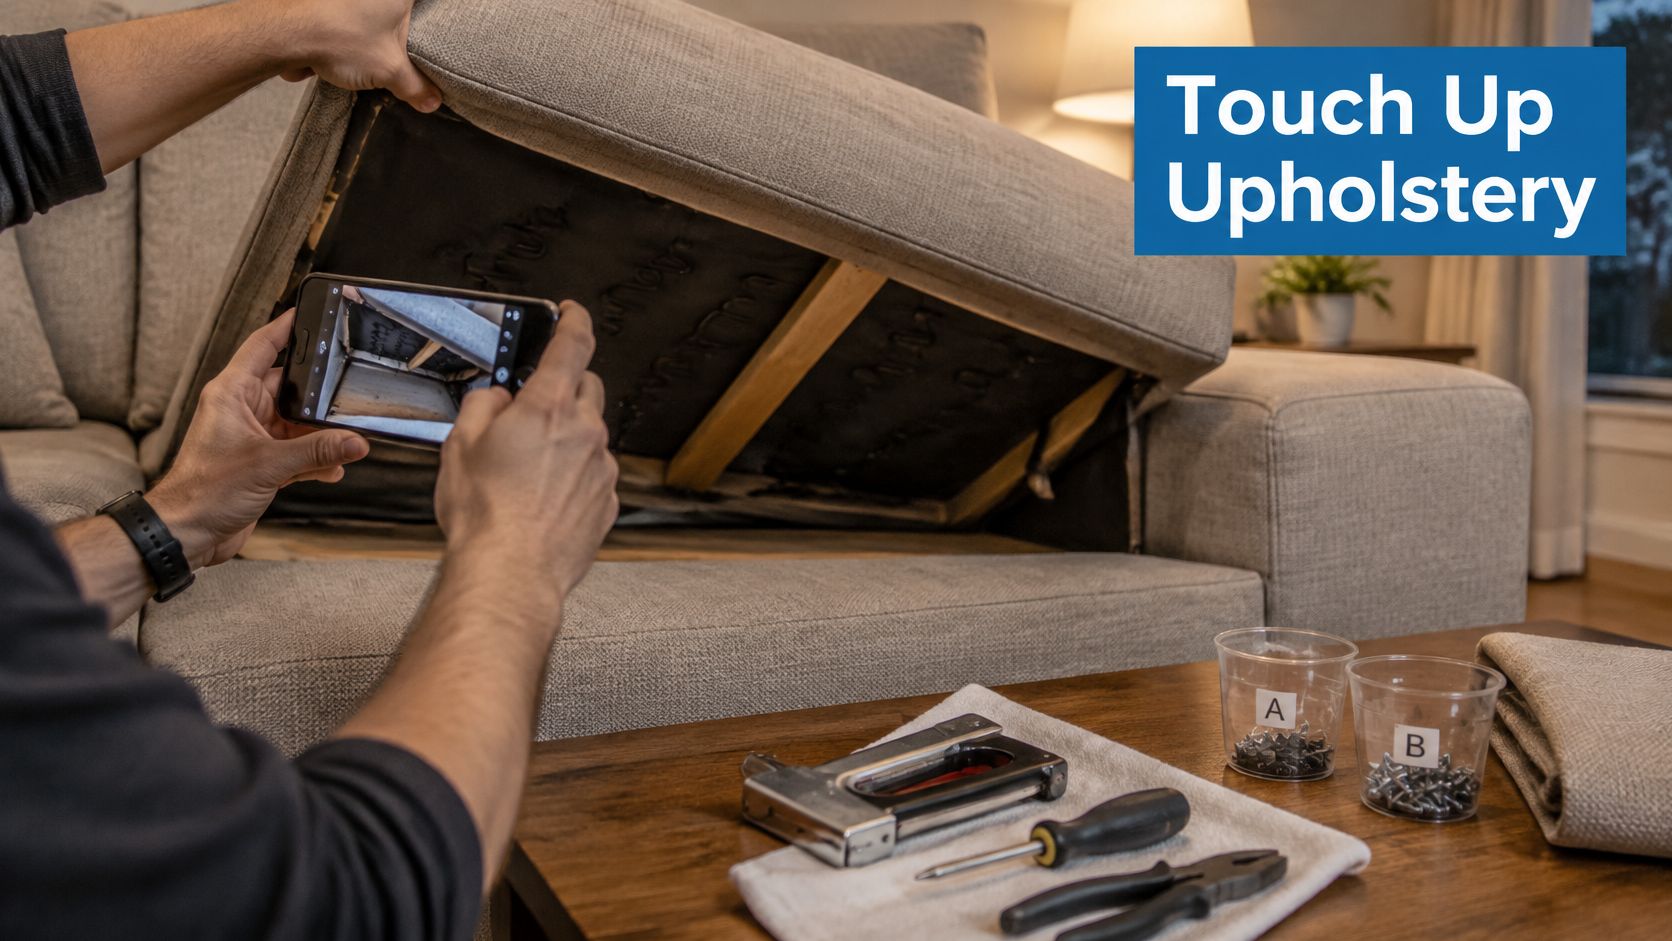
The workflow from Willis Furniture's guide to furniture upholstery follows a controlled order. You document, inspect support, then handle the cover. Skipping the middle step is the failure mode that ruins most home stitch work.
Six Steps for a Small Repair
- Photograph every side and the underside: Take photos before fabric moves so seams, pleats, and cushion order are easy to restore.
- Label hardware and cushions: Bag screws by location and note which cushion came from which seat, because cushions wear to their spots.
- Inspect frame, webbing, springs, and padding: Press the deck and look underneath. Replace failed support materials before you touch the cover.
- Pin from the center outward: For a popped seam on woven fabric, pin the middle first and work toward the ends while alternating opposite sides to equalize tension.
- Sew with heavy thread: Use a curved needle and upholstery thread, take small even stitches, and ease fabric rather than pulling it tight in one direction.
- Finish and test lightly: Knot securely, trim loose ends, replace the cushion, and sit gently before normal use.
Step 3 saves the whole job. A loose joint, broken webbing, or compressed foam transmits movement into the new cover and shortens repair life. New thread over a sinking deck tears out along the old holes within weeks.
Patches, Foam, and Webbing
For a small hole, cut a patch with enough extra fabric around the damage that its edges sit well clear of the stress point. A patch trimmed flush to the tear has nothing to grab, and the repair pulls out the first time the cushion flexes. Slip the patch behind the tear where you can, smooth it, and secure the edges. A patch works like a drywall patch: it holds at the edges, not at the hole.
Wrap replacement foam in polyester batting before the cover goes back. Batting reduces abrasion between foam and fabric and smooths the finished profile so the cushion doesn't look lumpy at the repair. It also helps the cover slide on without dragging.
When replacing a strip of webbing, secure one end, tension it with a webbing stretcher or controlled body weight, and fasten the opposite end in a tight crisscross pattern. Loose webbing feels fine for a day and stretches into the same dip you started with.
If you're stocking needles, thread, and webbing for the first time, the overview of upholstery supplies helps you tell upholstery weight materials from craft substitutes that won't hold a seat seam. Ordinary sewing thread is the most common false economy here.
Beginner limit: Start with simple, accessible pieces in woven fabric. Avoid thick leather or vinyl for a first project, because they're harder to tension and manipulate consistently.
Say a dining chair seat has a two inch split along the welt. The foam still springs back and the webbing feels taut. That's a good kit job. Pin the center, stitch outward, and you're done in an evening.
Now say the same split sits over a hollow dip. That's not a stitch problem anymore. If foam is permanently crushed or webbing has snapped across the whole seat, a patch won't bring the sit back. That failure belongs with a support board or new padding, not another needle.
Choose a Kit, a Support Board, or Replacement
Decide with money and durability, not hope. Three questions settle most cases: what the fix costs, how long it lasts, and whether the piece still feels right after a season of normal use.
When Each Path Wins
Buy a furniture repair kit when the defect is a scratch, a white ring, a small woven tear, or one sound loose joint. The work takes an evening, the materials are cheap, and the piece underneath is still doing its job. A kit restores the surface. It never restores the shape.
Add a support board when the shape fails under load but the frame is sound. Sagging cushions, sleeper bars, and wide slat gaps are load problems with good furniture around them. A board sized to that load costs far less than a sofa and skips reupholstery entirely.
Choose a professional or replacement when particleboard has crumbled, veneer has lifted across a face, a load-bearing rail is cracked, or mould and pests are present. Choose it too when your time is worth more than an inexpensive new piece. There's no prize for spending a weekend rescuing a chair you'd replace for the cost of materials.
If you're unsure whether a shop visit fits the damage, the advice on using a furniture repair shop helps you judge what to hand over and what to keep at home. Bring photos of the underside and any moving joint. Shops quote faster and more accurately from structure than from surface.
A sentimental chair, a rental rule against large deliveries, or a sofa that matches the room can justify a modest repair even when resale value is low. Run your own numbers, not a stranger's.
Do the Simple Cost Check
- Kit job: Small material cost, one evening, lasts if the structure under it is sound.
- Support job: Moderate one-time cost, minutes to install, lasts as long as the board carries the load it was sized for.
- Professional job: Higher cost and transport hassle, justified for broken frames, full reupholstery, or pieces with real value.
- Replacement: Highest cost plus disposal, justified when the frame, core, or safety is gone.
Take one concrete case. The Heavy Duty Sofa Cushion Support Board, a couch support for sagging cushions, is on sale for $29.99. It carries a lifetime warranty against defects in materials and workmanship, and Meliusly sends a free replacement if a product fails from a manufacturing defect or structural failure under normal household use. Wear and tear, misuse, improper installation, and commercial use fall outside that warranty. Set the board price against the cost of a new sofa plus a disposal run, at a point when only the sit has failed.
Measure before you decide. Record the cushion bay, the sleeper deck, or the slat layout with a tape, not a guess. Those numbers tell you which board fits and whether the frame can carry it. A board cut for the wrong bay rocks, creaks, and pushes stress into the weakest part of the frame.
Order of operations is what separates a one-purchase fix from a three-purchase spiral. Triage material and load first: a sound frame with a failed shape means support, a failed frame means replacement or a shop visit, and a failed surface alone means a kit. Get that far and you buy one product and finish, instead of stacking filler on a seat that needs a board under it.
If your sofa looks fine but sits low, or your sleeper guests feel every bar, measure the seat bay and look at our sofa supports, sleeper sofa support boards, bunkie boards, and bed slats at Meliusly. Match the support to the load you measured and keep the furniture you already like in service. Fix the finish with the kit afterward, once the shape holds.